Transform Photos with Sketch Portrait Action V-2
In the fast-paced world of digital content, standing out requires more than just high-resolution imagery. It demands style, personality, and a distinct visual voice. Whether you are a graphic designer crafting a brand identity, a marketer designing social media assets, or a hobbyist looking to elevate personal projects, the ability to quickly convert standard photographs into artistic sketches is an invaluable skill. The Sketch Portrait Photoshop Action V-2 offers a streamlined, professional solution for achieving this aesthetic without the need for hours of manual drawing or complex layer masking.
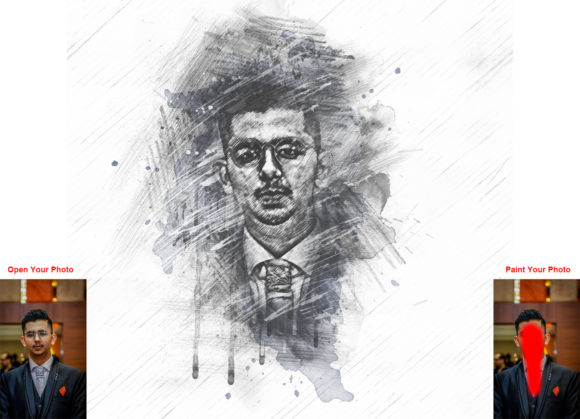
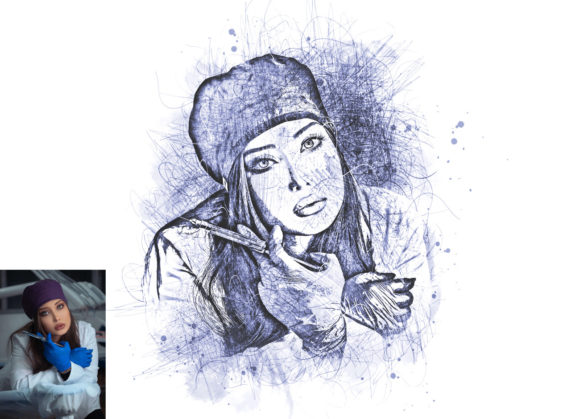
This tool is designed to transform your photos into a realistic sketch portrait look, turning ordinary images into extraordinary visual statements. By leveraging non-destructive editing techniques, it allows creators to maintain full control over the final output while significantly reducing workflow time. The result is a polished, hand-drawn appearance that adds depth and character to any project.
Why Choose a Non-Destructive Workflow?
One of the most compelling features of the Sketch Portrait Photoshop Action V-2 is its non-destructive nature. For professionals and enthusiasts alike, preserving the original image data is crucial. Unlike filters that permanently alter pixel information, this action utilizes adjustment layers and smart objects. This means you can tweak, refine, or completely reverse changes at any stage of the design process.
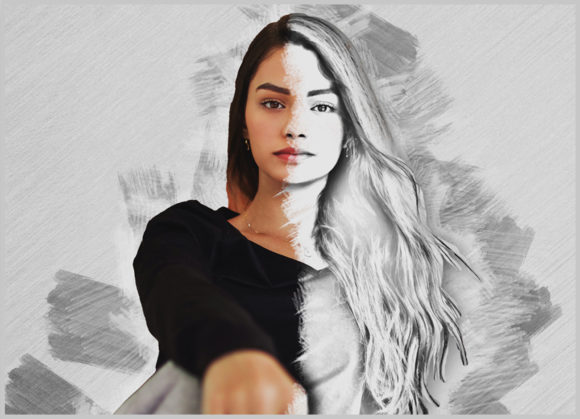
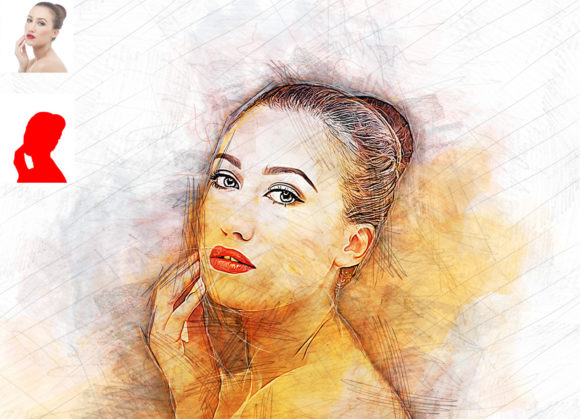
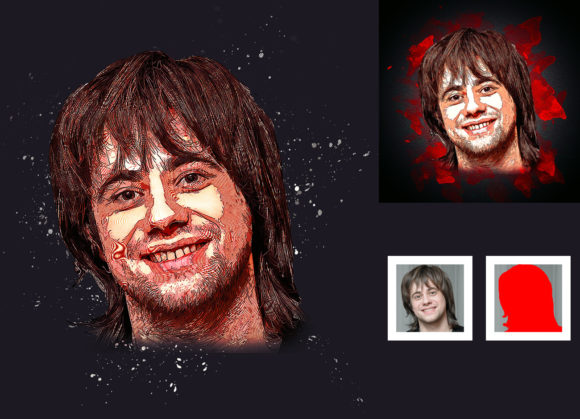
The action comes with ten different color options, accessible simply by toggling layer visibility. This flexibility allows you to experiment with various moods and styles—from stark black-and-white charcoal effects to softer, sepia-toned pencil sketches—without starting from scratch. Such versatility is essential when adapting content for different platforms. A bold, high-contrast sketch might work perfectly for a YouTube thumbnail, while a subtle, muted tone could be ideal for a corporate blog header or a printed portfolio.
Creative Applications Across Industries
The utility of this Photoshop action extends far beyond simple photo editing. Here is how different creators can integrate it into their workflows:
- Marketing and Advertising: Create eye-catching social media posts that stop the scroll. Sketch portraits often convey a sense of authenticity and craftsmanship, which can humanize brands and connect with audiences on a deeper level.
- Web Design and UI/UX: Use sketch-style avatars for team pages or user profiles. This adds a cohesive, artistic touch to website interfaces, breaking the monotony of standard stock photography.
- Educational Content: Educators and course creators can use sketch effects to illustrate concepts or create unique profile images for instructional materials, making dry content more engaging and visually appealing.
- Personal Branding: Freelancers and entrepreneurs can transform their headshots into distinctive logos or signature images. This helps in building a memorable personal brand that stands out in crowded marketplaces like LinkedIn or Behance.
Getting Started: Preparation and Setup
To achieve the best results with the Sketch Portrait Photoshop Action V-2, proper preparation of your source image is key. The action has been tested and verified to work seamlessly on Photoshop English versions, including CS5.5, CS6, and the CC series from 2014 through 2020. Ensuring your software is up to date and set to the English language interface will prevent potential script errors.
Before running the action, follow these essential steps to prepare your canvas:
- Open and Expand: Open your chosen image in Photoshop. For optimal processing, expand the space around your photo. Select the background layer, choose the Crop Tool from the toolbar, and drag the handles outward to add whitespace on all sides. This breathing room helps the algorithm detect edges more accurately.
- Resize for Consistency: Standardizing your image dimensions ensures consistent output quality. With the Crop Tool active, look at the top menu bar for the width, height, and resolution fields. Enter 3000px for width, 3000px for height, and set the resolution to 72 PPI. Press Enter to apply. This square format is particularly effective for social media and profile pictures.
- Create the Paint Layer: Create a new layer and rename it exactly as “paint” (in lowercase). This specific naming convention is critical for the action to recognize where to apply the effect. Using a soft brush, lightly paint over the main subject of your image. You do not need to be precise; broad strokes indicating light and shadow are sufficient. Once done, hide the visibility of this “paint” layer but keep it selected.
With these steps completed, you are ready to run the action. Simply click the play button in the Actions panel. The script will process the image, utilizing the painted guidelines to generate a realistic sketch effect. If the initial result isn't perfect, you can adjust the opacity of the generated layers or switch between the ten included color variations to find the perfect match.
Customization and Fine-Tuning
While the action provides an impressive out-of-the-box result, true creativity lies in customization. The included package provides not only the .ATN action file but also custom brushes and ten distinct color presets. These resources allow you to tailor the sketch to fit specific project requirements.
For instance, if you are working on a vintage-themed project, you might select a warmer, aged paper color option. For a modern, tech-focused design, a cool gray or high-contrast monochrome might be more appropriate. Because the effect is built on layers, you can further enhance the image by adding texture overlays, adjusting brightness and contrast, or blending additional elements using Photoshop’s robust layer styles.
It is also worth noting that the quality of the input image significantly impacts the output. High-contrast photos with clear subjects tend to yield the sharpest and most defined sketches. Soft, low-light images may require more manual painting on the “paint” layer to guide the action in defining edges and contours.
Maximizing Efficiency in Your Design Process
Time is a precious resource for any creator. By automating the tedious process of converting photos to sketches, the Sketch Portrait Photoshop Action V-2 frees up valuable hours for higher-level creative tasks. Instead of spending thirty minutes manually applying filters and adjusting curves for a single image, you can achieve a professional result in seconds. This efficiency allows you to iterate faster, test more concepts, and deliver projects to clients with quicker turnaround times.
Moreover, the consistency offered by an action ensures that all images in a campaign maintain a uniform look. This is particularly important for brand coherence. When managing multiple assets for a single client or project, using the same action with standardized settings guarantees that every sketch portrait feels part of a cohesive visual family.
Final Thoughts on Digital Artistry
Integrating tools like the Sketch Portrait Photoshop Action V-2 into your toolkit does not replace artistic intuition; rather, it amplifies it. It removes technical barriers, allowing you to focus on composition, storytelling, and emotional impact. Whether you are designing a wedding invitation, creating a unique avatar, or developing a marketing campaign, this action provides a reliable, professional foundation for your creative vision.
By understanding the preparation steps, leveraging the non-destructive workflow, and experimenting with the included color options, you can unlock new possibilities in your digital art. Embrace the blend of technology and creativity, and let your photos tell a new story through the timeless appeal of the sketch.