Integrating the Paint Splash Photoshop Action into Your Creative Workflow
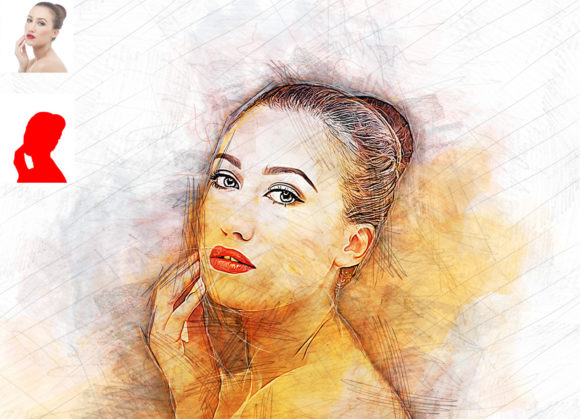
In the fast-paced world of digital design, efficiency is often just as valuable as raw creativity. Designers, marketers, and content creators constantly seek tools that bridge the gap between complex artistic vision and tight production deadlines. The Paint Splash Photoshop Action serves precisely this purpose. It is not merely a filter or a preset; it is a structured automation tool designed to transform standard photography into dynamic, painterly compositions. By understanding how this tool fits into a broader creative pipeline, professionals can leverage it to enhance visual storytelling without sacrificing technical control or workflow integrity.
Understanding the Tool Within a Professional Context
At its core, the Paint Splash Photoshop Action is a non-destructive editing solution. For those unfamiliar with automated Photoshop actions, these are recorded sequences of commands that can be played back on any image. However, what distinguishes this specific pack is its focus on realism and customization. It converts ordinary photos into extraordinary images that mimic the texture and fluidity of real paint splashes. This capability is particularly useful for advertising campaigns, social media graphics, album covers, and editorial layouts where high-impact visuals are required quickly.
The value proposition here lies in consistency and speed. When working on a series of images for a brand campaign, maintaining a uniform aesthetic is crucial. Manually painting splash effects for twenty different product shots would take days and likely result in inconsistent styles. Using a standardized action ensures that every image shares the same structural DNA, while still allowing for individual customization through color and brush selection. This balance between automation and artistic input is where the tool finds its strongest utility in professional environments.
Preparation and Compatibility: Setting the Stage
Successful implementation of any digital asset begins with proper preparation. Before integrating the Paint Splash Photoshop Action into your daily routine, it is essential to verify software compatibility. This action has been rigorously tested and optimized for English versions of Adobe Photoshop, ranging from CS5.5 up to the latest CC2020 releases. Whether you are using an older stable version like CS6 or the more recent CC2018 and CC2019 iterations, the action functions reliably. It is important to note that the action requires the English interface to function correctly, as it relies on specific layer names and menu commands that may differ in localized versions of the software.
Image resolution also plays a critical role in the final output quality. For optimal results, source images should ideally be around 2000x3000 pixels or 3000x2000 pixels at 72 DPI. This resolution strikes a balance between file size and detail, ensuring that the paint textures render sharply without overwhelming system resources. Working with images that are significantly smaller may result in pixelated edges, while excessively large files might slow down the processing time without adding noticeable visual benefit for web-based outputs.
The Execution Process: A Step-by-Step Integration
Integrating this action into your workflow is straightforward, but it requires adherence to a specific protocol to ensure the automation runs smoothly. The process is designed to be intuitive, yet it demands attention to detail during the setup phase. Here is how the execution typically unfolds within a project:
- Layer Preparation: Open your target photo in Photoshop. The first critical step is to create a new layer. This layer must be renamed exactly “paint” in lowercase letters. This naming convention is not arbitrary; the action script searches for this specific layer name to determine where to apply the effects. Failure to name the layer correctly will result in the action failing or producing unexpected results.
- Defining the Splash Area: Select the “paint” layer and choose a brush tool. Paint over the areas of the image where you want the splash effect to originate. This step gives you complete creative control. You are essentially telling the algorithm where the energy of the splash should come from. You can paint broadly for a large, explosive effect or use precise strokes for targeted accents.
- Hiding and Selecting: Once you have painted the desired areas, close the eye icon next to the “paint” layer to hide it. However, keep the layer selected. This ensures that the action can read the pixel data from the hidden layer without displaying it prematurely in your composition.
- Executing the Action: Open the Actions panel, locate the Paint Splash Photoshop Action, and click the play button. The software will now process the image, generating multiple layers that simulate the physics and texture of paint.
This methodical approach ensures that the user remains in control of the composition’s focal points while letting the software handle the complex rendering of textures and shadows.
Customization and Color Management
One of the standout features of this pack is its flexibility regarding color. Upon opening the action folder, users will find ten different color options available. These are not static overlays; they are integrated into the layer structure, allowing for easy modification. If the default colors do not match your brand guidelines or artistic vision, you can change them effortlessly. This level of customization is vital for marketers who need to align visual assets with specific corporate color palettes.
The non-destructive nature of the effect means that you can tweak these colors at any stage of the project. You are not locked into a final rasterized image until you choose to flatten the file. This allows for iterative design processes where clients or team members can request color adjustments without requiring the designer to restart the entire effect from scratch. The inclusion of organized layers further facilitates this, making it easy to isolate specific elements of the splash for fine-tuning.
Supporting Assets and Resources
A professional tool is defined not just by its primary function but by the ecosystem of resources that support it. The Paint Splash Photoshop Action package includes several auxiliary files that enhance its usability. Alongside the main ATN (Action) file, users receive custom brushes and patterns. These assets are pre-configured to work seamlessly with the action, ensuring that the textures look authentic and high-quality.
For users who are new to Photoshop actions, the inclusion of a comprehensive help file and a PDF user guide is invaluable. These documents provide troubleshooting tips and deeper insights into how the action works, reducing the learning curve. Additionally, the promise of 24-hour support offers peace of mind for professionals working on tight deadlines. Knowing that assistance is available if technical issues arise allows creators to adopt the tool with confidence.
Workflow Efficiency and Long-Term Value
Adopting the Paint Splash Photoshop Action is an investment in long-term workflow efficiency. For freelancers and small business owners, time is a direct cost. Reducing the time spent on repetitive manual tasks frees up resources for higher-level creative decisions. The ease of installation and the user-friendly design mean that even those with intermediate Photoshop skills can achieve professional-grade results.
Furthermore, the versatility of the tool allows it to be used across various types of projects. It works on every photo, from portraits to product shots, providing a consistent high-quality result. This adaptability makes it a reliable staple in a designer’s toolkit. Whether you are creating eye-catching social media posts, designing promotional materials, or experimenting with personal art projects, the action provides a robust foundation for creative exploration.
In conclusion, the Paint Splash Photoshop Action is more than a simple effect; it is a strategic asset for modern digital creators. By combining ease of use with professional-grade customization, it empowers users to elevate their visual content efficiently. Understanding its integration into your workflow, respecting its technical requirements, and leveraging its customizable features will allow you to maximize its potential. As digital media continues to demand higher quality and faster turnaround times, tools like this become essential for maintaining a competitive edge in the creative industry.